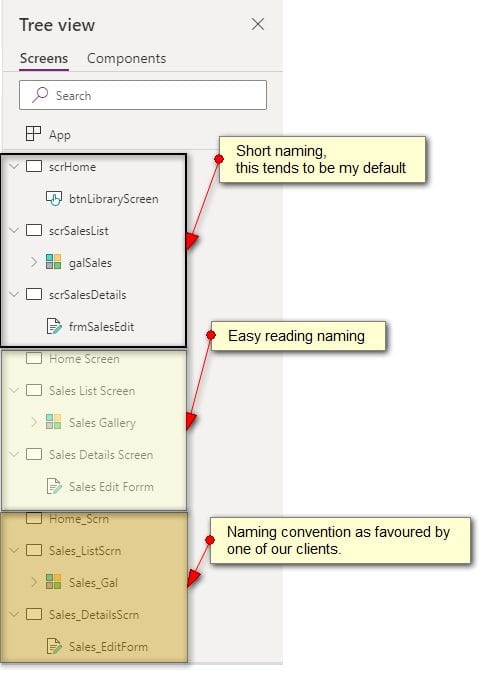
This post covers a suggested naming standard that will help to aid consistency and maintainablity when working on Power Apps. If you adopt the suggested three character prefix, you limit how much you need to type but still be able to distingish each control. You can also incorporate more expressive styles when naming Screen controls in your Power App, to differentiate these from Form controls. I suggest you keep this post in browser tab and refer as necessary.
Contents
- Suggested naming conventions
- Screen and Form etiquette ( shows why consistent naming standards matter)
“Noun before verb, you now you are forwarned”
By making the noun or object the next you type after the prefix, save you having scroll through lots of similar names, when trying to search for a given control or variable e.g. gblPurchaseOrderSelected instead of gblSelectedPurchaseOrder
Naming Conventions
So where to start…

Suggested Naming Standards
[divi_shortcode id=”219006″]It is also worth referencing the other resoures:
Naming Standards and Conventions for PowerApps (pragmaticworks.com)
A PowerApps Naming Convention Proposal – Power Platform Community (microsoft.com)
Screen and Form Etiguette
A consistent naming convention helps when navigating between screens in Power App: a common scenario is with a Screen containing a gallery of data items, and you want to navigate to a details screen which hosts an Edit Form. Passing data between screens is when you use a global variable, as once intialised it is visible on any screen in the app. Conversely, local variables are only visible on, ( or scoped to) the screen they are created in. Note this allows muliple screens to safely instantiate local variables with the same name, to perform similar tasks, again aiding consistency.
In the List or browse screen
In the OnSelect in the gallery item “>” icon ( see below)

Before you navigate to the Edit Form screen, you will need to set the view mode of the Form, placed on the screen. You can set the the inital Form Mode to View. In which case you will new Edit and New buttons or icons on the Details screen, to allow the user to later, set either call EditForm or ResetForm functions, depending on if you are updating an existing, or adding a new record. Finally pass the selected item ( record) to a global variable and navigate to the screen.
 ViewForm(frmProjectDetails);
// To allow the user to immediately admend the previously selected record, uncomment:
// EditForm(frmProjectDetails);


// use this global var to pass the current item data to the form
Set(gblProjectSelected, ThisItem);
Navigate(scrProjectDetails,ScreenTransition.None)
In the Details Screen ( with the Edit form control)
In the OnVisible you can intialise one or more local variables e.g. Storing the initial form FormMode ( Edit or View or New), allows you to perform certain actions, after the SubmitForm function, which sets the Mode to FormMode.Edit. One example, is to only create an intial Customer Support entry in a Support table when a new customer record is added to a Customer table.
 UpdateContext({lclInitialFormMode: frmProjectDetails.Mode});
// Again optionally, you might want to reset the item data if this going to be a new record
If(lclInitialFormMode = FormMode.New ,
      Set( gblProjectSlected , Defaults('<your data table or SharePoint list'))
);
Working with the form
Assign the gobal varable from the Gallery to the item property in the Form, to ensure the Form is able to display DataCard values.
gblProjectSelectedin the OnSelect event of your Submit: button or icon . capture the field values from the Data Cards and pass these into a local variable. Next call the SubmitForm function.
UpdateContext({lclFormUpdates : frmProjectDetails.Updates});
SubmitForm(frmProjectDetails)
In the OnSuccess property of the Edit form control , store the successfully submitted record into a local variable. Note if the data source generates an identity column value for an ID field, then the local variable will hold this value.
UpdateContext({lclFormSubmitted : frmProjectDetails.LastSubmit});
Notify("Project record: " & Text(lclFormSubmitted.RecId) & If(lclInitalFormMode = New , " added.", " updated.") NotificationType.Success,3000)


